Table of Contents
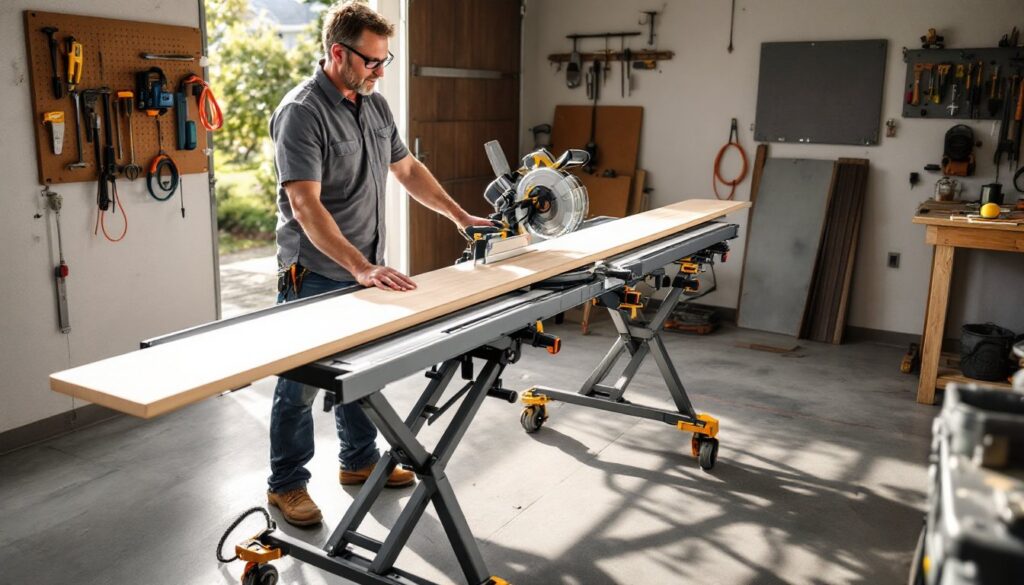
ToggleA miter saw without a stand is like owning a truck with no bed, it works, but you’re missing half the utility. Anyone who’s spent an afternoon balancing a 12-inch compound miter saw on sawhorses or a wobbly workbench knows the frustration of trying to cut 8-foot crown molding with no support. A dedicated miter saw stand transforms how you work: it provides stable, height-matched support for long stock, keeps the saw at a comfortable working height, and, in many cases, makes your whole setup mobile enough to roll from the garage to the jobsite. Whether you’re framing a deck, installing baseboard, or building furniture, the right stand turns cutting from a two-person juggling act into a one-person precision operation.
Key Takeaways
- A miter saw stand provides stable, ergonomic support for accurate cuts on long stock while reducing injury risk and enabling one-person operation.
- Choose between fixed, portable folding, or rolling miter saw stand types based on your workshop setup and mobility needs—each offers distinct advantages in stability, portability, and ease of storage.
- Look for stands with at least 300-pound weight capacity, adjustable material extensions, tool-free height adjustment, and stable leg geometry (24+ inches base width) to ensure safe, efficient performance.
- Proper setup requires leveling extensions flush with the saw table, securing the saw with manufacturer mounting brackets, and testing all joints before loading—small alignment issues cause binding, kickback, and injury.
- Always wear safety gear, clamp workpieces firmly, support long boards at both ends, and maintain a clear work area to prevent accidents and maximize cutting accuracy with your miter saw stand.
What Is a Miter Saw Stand and Why You Need One
A miter saw stand is a dedicated support structure designed to hold a miter saw at a safe, ergonomic working height while providing extendable wings or rollers to support long workpieces. Unlike a general workbench, a miter saw stand is purpose-built for crosscutting: the saw mounts to a central platform, and adjustable material extensions flank both sides to cradle boards as they pass through the blade.
Here’s why it matters. When cutting anything longer than 3 feet, baseboards, 2×4 studs, deck boards, trim, gravity pulls the unsupported end down, which can bind the blade, ruin the cut, or kick back the piece. A stand with material extensions keeps everything level and reduces the risk of injury. Most stands also raise the saw to waist or chest height, which means less bending and better sight lines on cut marks.
For anyone working alone or outside a fixed shop, a stand is non-negotiable. It keeps your saw secure, your cuts accurate, and your back from complaining after the third dozen boards. If you’re running extension cords in a driveway or setting up in a basement, a folding miter saw stand or mobile miter saw stand also makes teardown and storage far easier than leaving a heavy saw clamped to a table.
Types of Miter Saw Stands: Fixed vs. Portable vs. Rolling
Not all miter saw stands are created equal. The right type depends on whether you’re working in one place, moving between rooms, or hauling gear to job sites.
Fixed (Benchtop) Stands: These are permanent or semi-permanent setups, often shop-built from 2x4s and plywood or purchased as a heavy-duty steel frame. They’re rock-solid and can be customized with built-in storage, dust collection chutes, and extra-long wings for sheet goods or full-length lumber. If you have a dedicated workshop and don’t need to move your saw, a fixed stand gives you the most stability and surface area. Many woodworkers pair a miter saw and stand with a rolling cabinet underneath for blade storage and accessories.
Portable (Folding) Stands: Lightweight and collapsible, these are the go-to for contractors, DIYers working in tight spaces, or anyone who needs to store the saw between projects. Most folding miter saw stands use aluminum or steel tubing with quick-release levers and fold flat in under a minute. They typically support saws up to 300–500 pounds (combined weight of saw plus workpiece) and include extendable material supports. Brands like DeWalt, Bosch, and Ryobi dominate this category with models that weigh 25–40 pounds and collapse to fit in a truck bed or closet.
Rolling (Mobile) Stands: These combine portability with on-site maneuverability. A miter saw stand with wheels (or miter saw stands with wheels, depending on the model) features locking casters that let you roll a fully mounted saw around a garage, driveway, or jobsite without lifting or disassembling anything. Some have all-terrain wheels for gravel or grass. Rolling stands are ideal if you’re cutting in multiple rooms during a remodel or need to reposition frequently without breaking down the setup. The trade-off is slightly more bulk and weight than a basic folding stand.
If you’re also working with sheet goods or breaking down plywood, note that some stands double as a circular saw stand or circular saw table stand with adjustable fences and clamps, handy if you want one platform for multiple saws.
Key Features to Look for When Buying a Miter Saw Stand
Not every stand will fit every saw or every workflow. Here’s what separates a frustrating purchase from a tool that earns its keep.
Weight Capacity and Stability
Weight capacity is the total load the stand can handle, saw plus lumber, without flexing or tipping. A typical 12-inch sliding compound miter saw weighs 45–65 pounds: add a 16-foot 2×12, and you’re pushing 100+ pounds on the extensions. Look for stands rated at least 300 pounds for light to moderate use, or 500+ pounds if you’re cutting treated lumber, hardwoods, or long stock regularly.
Stability comes down to frame geometry and leg design. Wider stance legs (24+ inches apart at the base) resist tipping. Rubber or spiked feet grip smooth floors or soft ground better than bare steel. Steel tube frames generally outlast aluminum in heavy use, though aluminum keeps the stand light enough for one person to carry. If you’re shopping reviews on a popular woodworking site, pay attention to complaints about wobble under load, that’s a red flag.
Some stands include quick-release mounting brackets that let you swap saws in seconds, which matters if you’re sharing a stand between a 10-inch and 12-inch saw or moving between shop and truck.
Material Extensions and Work Support
The whole point of a stand is to support long stock, so extension wings or roller supports are critical. Most stands offer 3 to 8 feet of extension on each side, adjustable in height to match the saw table. Look for:
- Tool-free adjustment: Flip levers or spring pins beat hunting for a wrench mid-cut.
- Rollers vs. solid bars: Rollers let stock slide smoothly during repetitive cuts: solid bars are quieter and less likely to deflect under heavy boards.
- Material stops: Flip-down stops or measuring tapes built into the extensions speed up repetitive cuts (e.g., cutting 50 pieces of 2×4 to 16 inches for wall framing).
If you cut a lot of trim or narrow stock, consider stands with additional side supports or auxiliary tables. Some DIY enthusiasts add shop-built outfeed tables or clamp sacrificial plywood to the extensions for zero-clearance support on delicate moldings.
How to Set Up and Use Your Miter Saw Stand Safely
A stand only helps if you use it correctly. Here’s how to set up, mount, and operate safely.
Setup and Mounting:
- Unfold and lock the legs. Most folding stands have spring-loaded or lever-locked legs. Double-check that all four corners are engaged before loading the saw.
- Adjust height. The saw’s table should sit at a comfortable working height, typically 32 to 36 inches for most users. If you’re over 6 feet, go higher to avoid hunching.
- Mount the saw. Use the manufacturer’s mounting holes on the saw’s base and secure with bolts or the stand’s quick-mount brackets. Snug but not over-torqued (you don’t want to crack the casting).
- Level the extensions. Extend the wings or supports and adjust height so they’re flush with the saw table. Use a straightedge or laser level if you have one. Misaligned supports cause binding and kickback.
- Test stability. Press down hard on each extension. If anything flexes more than a quarter-inch, tighten hardware or reposition the stand on firmer ground.
Safe Operation:
- Always wear safety glasses and hearing protection. Miter saws throw chips at high speed, and prolonged use without ear protection can cause permanent hearing loss.
- Clamp or hold stock firmly. Never rely only on your hand to hold a board against the fence. Use the saw’s hold-down clamp or a quick-grip clamp on narrow pieces.
- Support both ends. Even with extensions, long boards need a helper or roller stand at the far end if they extend more than 6 feet past the saw.
- Keep the work area clear. Tripping over cutoffs or extension cords mid-cut is a common cause of accidents. Sweep often and route cords overhead or along the stand legs.
- Check blade guard and dust port. The blade guard should snap back freely after each cut. If you have dust collection, connect it, less sawdust means better visibility and cleaner lungs.
If you’re working outdoors, lock wheels (if your stand is a mobile miter saw stand) and verify the ground is level. An unlocked stand can roll mid-cut on even a slight slope.
For more detailed guidance on safe miter saw use and project planning, resources like Popular Mechanics’ tested stand reviews offer real-world performance data across brands and use cases.
Conclusion
The right miter saw stand makes every crosscut safer, faster, and more accurate. Whether you need a lightweight folding stand for weekend trim work, a heavy-duty rolling stand for job-site mobility, or a shop-built fixed station for daily use, the key is matching capacity, portability, and support length to your actual workflow. Set it up level, mount the saw securely, and keep your extensions adjusted, your cuts (and your back) will thank you.