Table of Contents
ToggleAn IKEA kitchen island might be the smartest upgrade a homeowner can make without breaking into structural work or emptying a savings account. These units deliver serious counter space, storage, and visual impact at a fraction of custom cabinetry costs. Whether someone’s looking for a ready-to-assemble standalone unit or planning to hack base cabinets into a custom island, IKEA’s modular systems offer flexibility that traditional big-box options can’t match. This guide walks through the most practical IKEA kitchen island choices, installation considerations, and DIY hacks worth the effort in 2026.
Key Takeaways
- IKEA kitchen islands cost $300–$1,200 assembled compared to custom islands at $2,000–$5,000+, making them an affordable counter space upgrade without structural work.
- VADHOLMA and TORNVIKEN are the most popular ready-to-assemble IKEA kitchen island options, both featuring counter-height design and seating overhangs for bar stools.
- DIY builders can create custom islands using SEKTION base cabinets arranged back-to-back, offering deeper storage and layout flexibility that matches existing kitchen cabinetry.
- Proper leveling, anchoring for safety, and adherence to the NKBA’s 42–48 inch clearance guidelines are essential before installation to ensure functionality and durability.
- Countertop material choice—whether solid oak, butcher block, laminate, or prefab IKEA tops—impacts maintenance requirements and long-term performance of your island.
Why Choose an IKEA Kitchen Island?
IKEA kitchen islands solve two problems at once: they’re affordable and surprisingly well-engineered for the price point. A quality custom island can run $2,000–$5,000 or more depending on materials and region, while most IKEA options land between $300–$1,200 assembled.
The real advantage is modularity. IKEA’s cabinet systems use 32mm standard spacing for shelf pins and hinges, making it easy to swap components, add drawers, or reconfigure down the road. That’s not true of most pre-fab islands sold at home centers, which are essentially sealed boxes.
Another factor: seating flexibility. Many homeowners want an IKEA kitchen island with seating to replace a breakfast nook or add casual dining space. IKEA’s freestanding islands like VADHOLMA and TORNVIKEN include overhangs designed for stools, while DIY builds using SEKTION base cabinets can incorporate custom countertop extensions for bar-height seating.
Finally, IKEA islands are DIY-friendly. Most units require only a screwdriver, a level, and basic assembly skills. No miter saw, no dado blades, no complex joinery. If someone can build a bookshelf, they can handle an IKEA island.
Safety note: Even freestanding islands should be anchored if they’re tall or top-heavy, especially in homes with kids. Use furniture anchors or L-brackets to secure the unit to the floor or adjacent cabinetry.
Most Popular IKEA Kitchen Island Options
IKEA’s catalog includes a few ready-made islands and a much larger universe of hackable base cabinets. Here’s what’s actually worth buying in 2026.
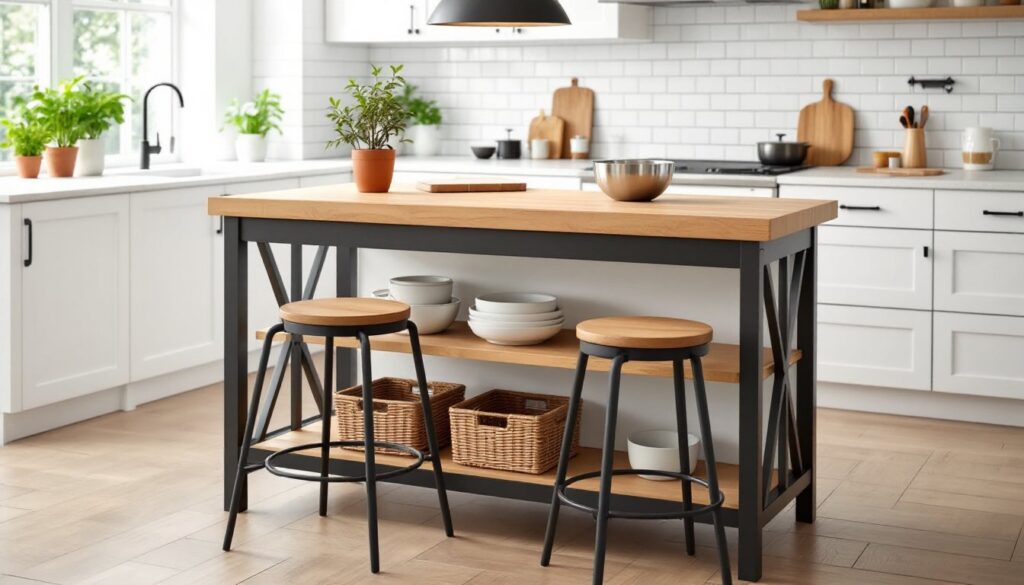
VADHOLMA Series
The VADHOLMA is IKEA’s workhorse island. It comes in two sizes: a smaller unit at roughly 49 ⅝” wide and a larger version at 78 ¾” wide. Both feature a solid oak countertop (butcher-block style) that’s durable and can be sanded and re-oiled over time.
Key specs:
- Height: 35 ⅜” (standard counter height)
- Storage: Open shelving on one side, towel rails on the ends
- Assembly: Freestanding: no hardwiring required
- Weight capacity: Approximately 220 lbs on the countertop (verify current specs at purchase)
The oak top needs maintenance. It’s untreated out of the box, so apply food-safe mineral oil or a hardwax oil finish (like Rubio Monocoat or Osmo) before use. Expect to re-oil every 6–12 months depending on traffic.
VADHOLMA works well in kitchens where the island doubles as a prep station and display shelf. The open design keeps sight lines clear in smaller spaces, though it won’t hide clutter the way enclosed cabinets do.
TORNVIKEN Series
The TORNVIKEN is a newer addition and offers a more traditional enclosed-cabinet aesthetic. It’s available in two widths (49 ⅝” and 78 ¾”) and comes in black or off-white finishes.
Key specs:
- Height: 35 ⅜”
- Storage: Drawers and cabinets with adjustable shelves
- Countertop: Particleboard with a laminate or wood-effect surface (not solid wood)
- Assembly: Freestanding, similar complexity to VADHOLMA
TORNVIKEN’s enclosed storage is better for hiding small appliances, mixing bowls, and kitchen clutter. The drawers are soft-close, which is a nice touch at this price point. But, the countertop isn’t as robust as VADHOLMA’s solid oak, don’t use it as a cutting surface without a board, and be cautious with hot pans (use trivets).
Both VADHOLMA and TORNVIKEN include a seating overhang on one long side, making them solid choices for a kitchen island IKEA setup with stools. Standard counter-height stools (24″–26″ seat height) fit comfortably underneath.
DIY IKEA Kitchen Island Ideas Using Base Cabinets
Many DIYers skip the freestanding islands and build custom islands using SEKTION base cabinets. This approach unlocks more layout options, deeper storage, and the ability to match existing kitchen cabinetry.
Basic concept: Arrange two or more SEKTION base cabinets back-to-back or in an L-shape, secure them together, add a countertop, and optionally install a toe kick or decorative base.
Materials list (for a simple 4′ × 3′ island):
- Two SEKTION base cabinets (24″ deep × 30″ high, width as desired)
- Countertop material (butcher block, laminate, quartz, cut to size)
- Cabinet legs or a plinth (IKEA sells adjustable legs: some builders use a custom toe-kick frame)
- Trim or panel for finished ends (IKEA BODBYN or GRIMSLOV cover panels work well)
- L-brackets or connector bolts to join cabinets
- Screws and shims for leveling
Tools needed:
- Drill/driver
- Level (24″ or longer)
- Circular saw or jigsaw (if trimming countertop)
- Measuring tape
- Safety glasses and dust mask
Step-by-step outline:
- Assemble cabinets. Follow IKEA’s instructions. Don’t install doors or drawer fronts yet, easier to handle.
- Position and level. Set cabinets in place back-to-back or side-by-side. Use shims under legs to level in both directions. A 1/8″ variance across 4 feet is acceptable: anything more will cause doors to swing open.
- Join cabinets. Drill pilot holes through cabinet sides and use connector bolts or wood screws (1 ¼” #8 screws work) to clamp units together. Check level again after joining.
- Add finished ends. Attach IKEA cover panels to exposed cabinet sides using the included clips or small finish nails and construction adhesive.
- Install countertop. Secure from below using L-brackets or figure-8 fasteners. Leave room for seasonal wood movement if using solid wood (don’t over-tighten screws). Overhang can be 10″–12″ for seating, 1″–2″ for a clean edge with no seating.
- Attach toe kick or base trim. Cut to length and secure with finish nails or adhesive. Paint or stain to match.
- Mount doors and hardware. Adjust hinges so doors are flush and aligned.
Pro tip: For a waterfall edge or other custom countertop details, enlist a fabricator if working with quartz or stone. Solid wood and laminate are DIY-friendly with the right saw and patience.
For advanced ideas and visual inspiration, creative kitchen island hacks show how others have combined IKEA components with custom touches like open shelving, wine racks, and integrated power strips.
Installation Tips and What to Consider Before You Buy
Before ordering cabinets or wheeling home a VADHOLMA, measure twice and think through these practical details.
Clearance and traffic flow: The National Kitchen and Bath Association (NKBA) recommends at least 42 inches of clearance on all sides of an island for a single cook, and 48 inches if multiple people will be working simultaneously. In tight kitchens, a narrower rolling cart may be smarter than a permanent island.
Electrical and plumbing: Adding outlets or a sink to an island requires running wiring or plumbing through the floor. That’s not a DIY task in most jurisdictions, hire a licensed electrician or plumber, and pull permits. NEC (National Electrical Code) requires at least one receptacle on an island if it’s 24″ × 12″ or larger, and it must be GFCI-protected. Codes vary, so check with the local building department.
Anchoring: Freestanding islands don’t have to be anchored, but it’s good practice if the unit is over 30″ tall. Use L-brackets screwed into floor joists (if you can access them) or toggle anchors into the subfloor. For islands over tile, use masonry anchors.
Countertop choices: IKEA sells several prefab countertops (KARLBY, PINNARP, EKBACKEN) that fit VADHOLMA and TORNVIKEN, or can be cut to size for DIY builds. KARLBY (walnut veneer on particleboard) is popular for its look and price (~$200 for 74″), but it’s not waterproof, seal edges and joints with silicone. For a more durable surface, consider solid butcher block or a custom laminate top. Quartz and granite are overkill for most IKEA island projects unless matching existing counters.
Seating dimensions: For comfortable seating, allow 24 inches of width per person and a 10–12 inch countertop overhang. Stools should sit 10–12 inches below the counter surface. Standard counter height is 36″: bar height is 42″. IKEA’s freestanding islands are counter height, so stick with 24″–26″ stools.
Leveling floors: Most floors aren’t perfectly flat. Adjustable legs (IKEA’s SEKTION system includes them) let you compensate for up to ½” of variance. Beyond that, consider shimming or leveling compound before installation. An out-of-level island will stress joints and cause doors to sag over time.
Paint and finish: If painting IKEA cabinets, use a bonding primer (like Benjamin Moore STIX or Zinsser B-I-N) to help paint adhere to the melamine or laminate surfaces. Lightly sand with 220-grit, clean with denatured alcohol, prime, then topcoat with a durable enamel or cabinet paint. Small kitchens often benefit from lighter colors to keep sight lines open, as many design guides recommend.
Delivery and assembly time: IKEA flat-packs are compact but heavy. A VADHOLMA ships in multiple boxes totaling 100+ lbs. Budget 2–4 hours for assembly on freestanding units, longer for custom cabinet builds. Have a helper on hand, wrangling a countertop solo is a recipe for a smashed finger or a chipped edge.
Weight limits: IKEA publishes load ratings for shelves and countertops. Don’t exceed them. Storing cast-iron cookware, stand mixers, and small appliances adds up fast. Distribute weight evenly and avoid cantilevering heavy items over unsupported spans.
Conclusion
An IKEA kitchen island, whether off-the-shelf or custom-built from base cabinets, delivers real value without the lead times and costs of bespoke cabinetry. VADHOLMA and TORNVIKEN cover most homeowners’ needs out of the box, while SEKTION cabinets open the door to truly tailored layouts. Measure carefully, plan for clearances, and don’t skip the leveling step. With a weekend and basic tools, most DIYers can add functional counter space and storage that’ll serve them for years. For more curated remodeling ideas and product sourcing, explore resources like Remodelista to see how design professionals approach kitchen upgrades.